
Creating a Subscribe Popup to Email List
Collecting details of customers interested in your products and having them agree to receive marketing communications from you is an important aspect of your business activity.
Therefore, an essential popup for eCommerce websites invites website visitors to subscribe to the email list.
Creating a Subscribe to Mailing List Popup
- Click "Weblayers" on Flashy's top toolbar.
- Click the blue "Create Weblayers" button in the upper right-hand corner.

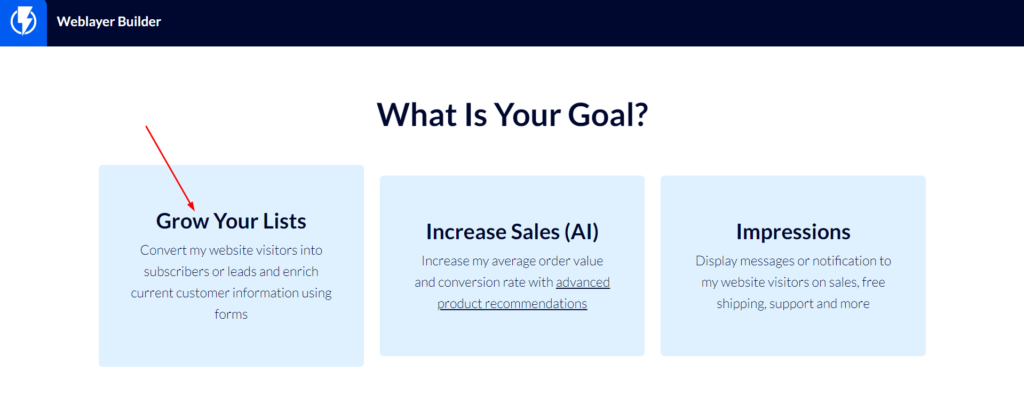
- For the popup's goal select "Grow Your Lists"
- Select the desired template from the wide variety available.
- Enter a title for the popup and click "Next step".
- You are now in the popup editor – here you can design the popup and its content (click here to read about the popup editor options).
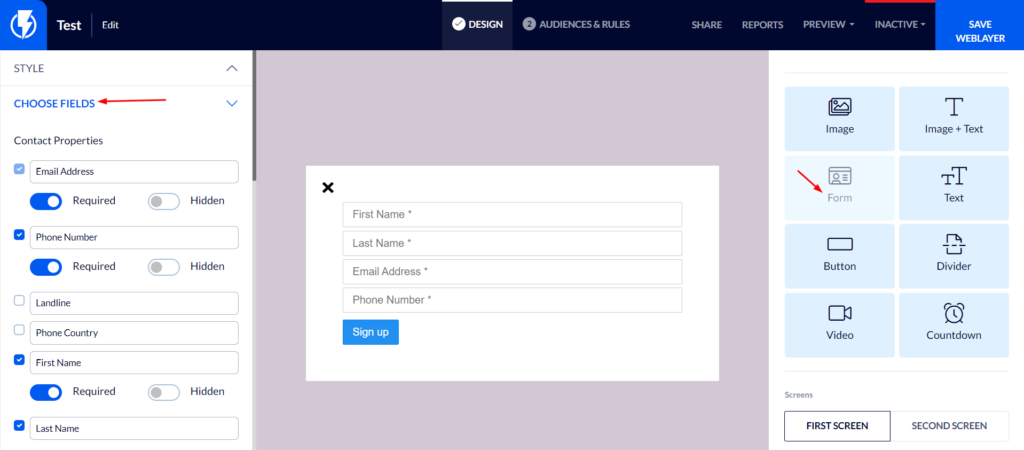
A key element that you will add while creating a subscribe popup is the "Form" element – enabling you to select the details you wish to collect from customers who subscribe to your mailing list.
When hovering over the form element, its settings will open on the left-hand side. Then, under "Contact's details", you may select the fields that will appear on the popup.
- To add a field, check the check box next to it.
- For the field to be a required one, switch on the "Required" switch next to it.
If necessary you may change the order of the fields by hovering over a field in the form and dragging it to its desired location:

- When you have finished designing the popup, click "AUDIENCES & RULES" at the top of the screen.
Here you can see to whom the popup you have created will be displayed and under what conditions.

AFTER SUBMISSION
Under "Add Contacts To" – select the mailing list to which you wish to add a contact who subscribes through this popup.
- If you wish to later create and add a "Welcome" automation that will accompany the popup and send messages to all who subscribe through it – we recommend creating a unique mailing list for all who subscribe through this popup – click here to learn about creating a mailing list on Flashy.
Under "Response Type" – select the action that you want to take place once the customer signs up: the popup will close / the customer will be forwarded to a certain URL / the second screen of the popup will be displayed (for instance a "Thank you for subscribing!" screen) / another, altogether different, popup will be activated.
TRIGGERS & TARGETING
Under "Display to" – check only the "Visitors" checkbox (there is nothing to be gained by displaying the popup to customers whose details already exist in your Flashy database).
Select if the popup is to be displayed on computer desktops / mobile or both.

Under "When To Display" – select when you want the popup to be activated (you must select at least one trigger).
Under "Frequency" the recommended selection is "New & returning visitors".
Under "Sequences" – select according to your preferences.
Under "How To Count Settings" – select "once a visitor has seen the first screen of the popup".

- Finally, click "Save Weblayer".
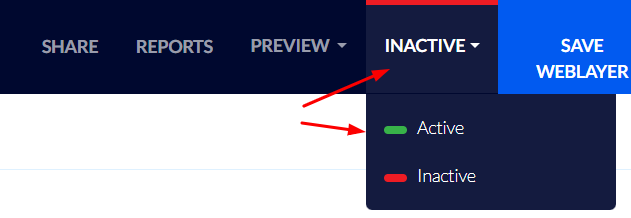
To activate a popup, you must change its status to active at the top right-hand side of the screen.
You may deactivate the popup at any time by switching the switch back to "Inactive".
The next recommended step is creating a "Welcome" automation to accompany subscribers from the popup, send them greetings, and encourage them to make a purchase, click here to read about creating a "Welcome" automation.
